Posted by Chris Wong on December 08, 2012 0 Comments
Why We Love Gaia's All Purpose Fertilizer:
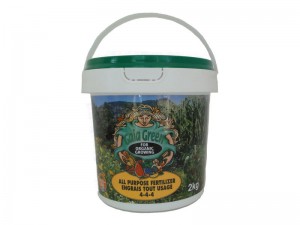
Gaia Green All Purpose 4-4-4 Fertilizer provides a balanced blend of organic nutrients for the edible plants in your landscape. It comes as a fine, dry, granular material with varying particle sizes and can be used on all types of plants including fruit bushes, vegetables, trees, shrubs, and more. It is made from a variety of GMO-free ingredients for a more balanced mix of micro- and macro-nutrients.
Why Our Customers Love This All Purpose Fertilizer:
This fertilizer can be mixed applied directly as a top dressing into the vegetable garden, as part of a homemade seed starting or potting soil blend, or into a solution with water and applied as a tea. The 2kg tub has a convenient carrying handle and can be reused or other garden applications.
All Purpose Fertilizer More Information:
Gaia Green products are designed to improve the general vitality of your soil. They are free os synthetic fertilizers and pesticides and is an excellent environmentally friendly product. The 2kg tub has a very tight snap on lid to keep the product safe from moisture, rodents, and other insects.
Ingredients:
Alfalfa Meal, Bone Meal, Blood Neal, Glacial Rock Dust, Mined Potassium Sulphate, Fossilised Carbon Complex, Rock Phosphate, Greensand, Kelp Meal, and Gypsum.
Purchase the Gaia Green All Purpose 4-4-4 Fertilizer from our online store today.
Read More
Posted by Chris Wong on December 11, 2012 0 Comments

Garlic is an easy to plant and easy to grow crop. Read what you need to know on how to plant to ensure a great harvest for next year's growing season.
Q. When Do You Come To Plant Garlic?
A. Garlic planting in the GTA starts in early October. Planting for the season finishes by the end of the month.
Q. How Long Does It Take to Grow?
A. Garlic planted in the fall will be ready to harvest the following year in late July or early August. In the spring, you will be able to harvest some of the garlic scapes, but the main bulb remains in the ground and continues growing until July/August.
Q. How Much Garlic Should I Plant?
A. The amount of garlic you want to grow depends on how much garlic you and your family typically eat and how much garden space you have. Garlic needs around 6” of space on all sides, which means we can plant 4 cloves per square foot. A bed that will produce 100 heads will need an area of 25 square feet. Previous YUF customers with our raised beds can fit up to 64 cloves in each 4'x4' or 2'x8' Raised Bed.
Q. Can I Purchase Individual Bulbs From You To Plant Myself?
A. Yes, please email us with your request no later than September 15th.
Q. What Variety of Garlic Do You Grow?
A. Our favourite variety of garlic to grow in Toronto is called Music and it is especially suited for our harsh Canadian winters and hot summers. Each organically-grown clove that we plant will eventually grow into a medium sized head with around 5-7 cloves per head. It has a white parchment skin with a slight blush of pink colour.
Q. Under What Conditions Does Garlic Grow Best?
A. Garlic grows best in rich, well-drained soil. We recommend adding in additional compost to ensure a large, well-formed head of garlic. After planting in October, garlic needs a cold, dormant period before restarting its growth in the spring. Please see of our Garlic Growing Guide, which can be downloaded as a pdf.
Q. Why Should I Add Extra Compost Once My Garlic Has Been Planted?
A. Garlic is considered a heavy feeding plant, which means it needs lots of nutrients and organic matter in order to get best results. For those of you with a composter or worm composter, you can add your own finished compost directly on top of your garlic. We can also supply our own unique blend of soil, that will help in the growth and development of your garlic plants.
If you have a question that isn't answered below, please email us at info@youngurbanfarmers.com. For information on how to care for the garlic once it has been planted, read our Garlic Growing Instructions. Want to order garlic and have it planted for you in the spring (GTA only)? Order your fall garlic planting service today.
Read More
Posted by Chris Wong on December 08, 2012 0 Comments

Learn how to grow and harvest garlic once it has been planted. Detailed steps are included for fall, winter, spring, and summer.

After your garlic has been planted, mulch the bed with a couple inches of organic matter to insulate the garlic, suppress weeds, and regulate the temperature fluctuations in the fall and spring. Straw is our preferred choice since it is light, biodegrades quickly, and is available at most garden centres. Leaves, wood chips, and other organic matter can also be used.
Do not mulch if your soil stay excessively wet or is slow to drain.

Garlic needs a cold dormant period during the winter. It's fine just as it is.

Your garlic will send up new growth through the mulch. Remove the mulch only if it is very thick (more than 4") to help the new growth come up more easily. Ensure the area is well weeded and watered. For most in-ground plantings, regular rainfall is usually sufficient to ensure even soil moisture. You may also choose to add extra compost and organic matter to the soil as garlic is a heavy feeder and prefers a soil rich in organic matter.
If your soil is sandy or if there is a drought or heat spell, you may need to water the plants once a week to maintain even soil moisture.
In late spring, garlic will send up a long curly scape When it curls and before the flower head opens, break or cut it off to encourage the plant to divert its energy into producing bigger bulbs rather than into flower production. Use the scapes just as you would use garlic.

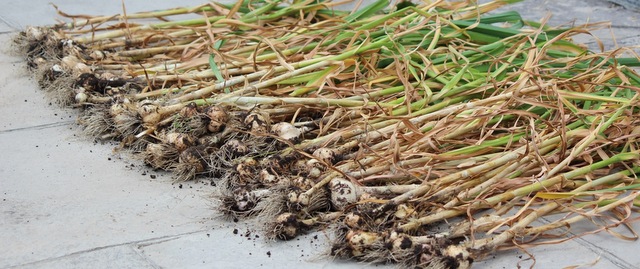
In July, stop watering the garlic. Over watering will cause the bulbs to swell too much and not dry or cure properly. When about half the leaves have turned brown (starting end of July), harvest the garlic by loosening the soil with a garden fork or shovel and pulling the stalk straight up and out to remove the bulb.
Brush off excess dirt and cure the bulb by hanging it in a warm, dry, well-ventilated location for 2-3 weeks out of direct sunlight. A garage, shed, or basement are excellent places to hang the garlic. Avoid hanging more than 20 heads of garlic in the same bunch. To promote good air circulation, we suggest leaving a door open or a fan running to help cure the garlic. After 2-3 weeks, brush off any excess dirt and cut off the roots and stalk. Do not cut or puncture the skin surrounding the individual cloves and head of garlic.
Store at room temperature (15-18C) in a dark, dry place for best results. A brown paper bag is ideal. Set aside damaged bulbs or bulbs where the wrapper did not fully seal the individual cloves for use within 1-2 weeks.
Download these instructions as a 1-page PDF file and order your fall garlic planting service today.
Read More


