Storing Your Mushrooms To store your shiitake mushrooms, keep them in the refrigerator in a loosely closed paper bag. They will keep fresh for about one week.
Preparing Your Shiitake Mushrooms Mushrooms are very porous, so if they are exposed to too much water they will quickly absorb it and become soggy. The best way to clean mushrooms without sacrificing their texture and taste is to clean them using minimal, if any, water. Wipe them with a slightly damp paper towel or kitchen cloth. You may also use a mushroom brush, available at most kitchenware stores. Shiitake stalks, especially those from dried mushrooms, are usually removed before cooking as they are rather tough and fibrous. Set the stalks aside for soups, stews, or teas.
Cooking Your Shiitake Mushrooms Shiitake mushrooms are very versatile and compliment many things. Even people who don’t normally like the typical white mushrooms from the grocery store find that they truly enjoy the taste of shiitakes because it is so distinctly and flavorful. Here are some of our top suggestions for using shiitake mushrooms:
Grill or bake mushrooms whole
Add grilled mushrooms to vegetable stock or sauces for increased flavor
Slice and add to stir-fries
Add into miso soup
Sautee with onion and garlic
Drying Your Shiitake Mushrooms If you have too many mushrooms to use, consider drying some for future use. Dried mushrooms can stay fresh for up to 1 year, sometimes longer if stored in a tightly sealed container in the refrigerator or freezer. Here's how to dry your mushrooms.
Clean mushrooms thoroughly
Place shiitakes on wire racks or thread with fishing line
Place the wire rack or threaded mushrooms in a warm, dry place with plenty of air circulation
Wait about 1 week until mushrooms have dried
You can also use a dehydrator or place the mushrooms on the lowest setting in your oven (with the door proper open by 1”) for several hours to speed up the process
Store dried mushrooms in tightly sealed glass jars, canisters, or plastic bags for up to one year
Other Tips:
Keep your mushrooms in airtight containers to avoid moths and other critters from getting into your mushrooms
Thread shiitakes through the base of the mushroom and remember to unthread them before storing
Using Dried Mushrooms Soak shiitakes in tepid (luke warm) water for thirty minutes. This help to rehydrate them. For a faster method, soak whole or broken up pieces in enough boiling water to cover for about 20 minutes or until they plump back up. They are now ready to use in place of fresh-picked and yield a chewier texture. Save the soaking water to add to gravy or soup or enjoy it as a nourishing drink. Dried shiitakes can be broken up and added to soups, stews, sauces or any dish calling for mushrooms.
Blanching and Freezing Instructions Blanching and freezing is another way to store your mushrooms. Blanching and freezing your mushrooms is another great way to preserve the texture and flavor of the mushrooms. Blanching is essential to the texture preservation as freezing shiitake uncooked will destroy the cellulose structure, rendering you with shiitakes mushroom slime.
Materials Needed:
Airtight containers: glass, plastic bags and other canisters work well
Pot for boiling mushrooms
Instructions:
Clean your mushrooms thoroughly
Chop into 1” chunks or leave small specimens whole
Bring a large pot of water to a rapid boil. Place mushroom into the water for about 3 minutes or until barely cooked
Once the mushrooms are barely cooked, (they should still be firm enough to hold their shape), remove them from the water and press out the excess water. You can consider saving the water to use as a stock base for later
Let the mushrooms air-dry for 30 minutes, with paper towels underneath them to absorb extra moisture
Place mushrooms in a heavy freezer bag and freeze for up to six months. We recommend keeping the quantity of shiitakes in each freezer bag small for individual servings/portions
Defrost mushrooms in the fridge before using. Enjoy! Want to purchase your own shiitake mushroom log? Get one from our online store Do you have any other questions, tips or suggestions you want to share. Let us know at shiitake@youngurbanfarmers.com.
Posted by Chris Wong on December 08, 2012 0 Comments
Why We Love It
The Balconera comes in two different sizes. The small size has one removable liner and measures 50cm (20") across and the large size has two removalbe liners and measures 80cm (32") across. We love the woven wicker design of the container, which comes in four colours (white, granite, mocha, and black). It is made from UV-stabilized, food-grade plastic and can be left outdoors during the winter or brought inside to extend the growing season if you have a sunny window.
Why Our Customers Love It
Our customers love the Balconera because of its versatility. It can be placed indoors or out, on a flat surface or mounted to a railing. Despite its small size, herbs, greens, and edible flowers all grow great in this container. If it is mounted on a wide railing, extra long mounting straps (80cm or 32") are available. Regular length straps are 40cm or 16" long and are suitable for most balcony railings.
Additional Information
The Lechuza sub-irrigation system will allow your plants to go up to a few days without wateringthanks to its built in reservoir. Exact results will vary based on temperature, wind conditions, type of plants, etc. The removable liner and exclusive Lechuza-pon drainage material allows them to flourish without sitting in standing water. Your plants will still need to be watered the traditional way (from above) for the first couple of weeks to allow the roots to stretch and reach down into the pon material, but once established, simply fill up the reservoir and enjoy simple watering and plant maintenance.
The optional brackets securely hold the Balconera in place and are not visible from the front of the unit. It can be easily assembled and disassembled for winter storage. They come in two colours - white and black. The small size features one (1) removable plant liner for easy setup and assembly. It measures 20" x 7" x 7", has a soil capacity of around 8L and reservoir capacity of around 3L. The large size features two (2) removable plant liners for a modular setup and ease of assembly. It measures 32" x 7" x 7", has a soil capacity of around 12L and reservoir capacity of around 5L.
Posted by Chris Wong on December 08, 2012 0 Comments
Why We Love It:
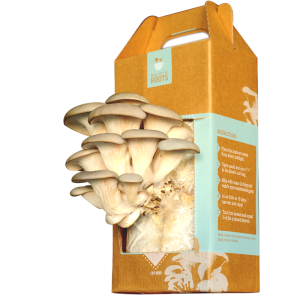
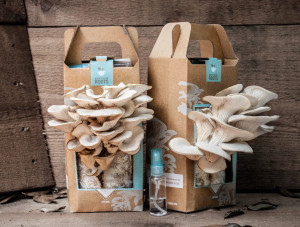
The Oyster Mushroom Kit from Back to the Roots allows you to grow your own gourmet oyster mushrooms inside your home no matter what time of year it is. Following a few simple steps will allow you to enjoy the freshest mushrooms with minimal work and effort.
Why Our Customes Love It:
Our customers love how easy it is to grow their own mushrooms. It is excellent in soups, stir frys, on pizza, or wherever you want to add some extra mushroom flavour. We've also received a lot of compliments from people about how this makes an excellent gift for "the person who has everything". It is a fun experience both for kids and adults alike. Download a pdf copy of our Oyster Mushroom Kit Instructions.
Additional Information:
Each kit is made from recycled coffee grounds and innoculated with oyster mushroom spawn. It can be kept in a cool and dark location for a few months if it is not to be used right away.
It is normal not to always see mushroom forming within 10 days. Some kits just take a bit longer than others, due to ambient temperatures, humidity level, and soaking time. As long as you see the white mycelium inside the bag, there isn't much to worry about.
If you want to speed up or revive a stuck bag, another soaking of the bag generally does the trick. Leave it overnight and let the water drain.
We suggest placing the bag indoors in a location where it gets ambient light with both darkness at night and indirect light during the day, but not direct sunlight. Also avoid putting the kit close to a radiator or AC unit.
Fresh air is also important for the mushroom so make sure they're not suffocated.
Posted by Chris Wong on December 08, 2012 0 Comments
Why We Love It:
The soil that your plants grow in is the foundation of your garden, providing nutrients, water, and support for your plants. That's why we've gone to great lengths to create both our YUF Custom Soil Blend and our YUF Potting Soil Mix, which are easy to work with, full of rich organic matter for your plants, and provides great results. It is made without any animal byproducts from a blend of worm castings, vegetable compost, peat moss and vermiculite making it loose, friable, and very easy to work with. It is unlike anything you'll find at your local garden center.
Why Our Customers Love It:
Our customers love the results that they get with our soil mix as well as the rich earthy aroma it has. Our custom soil blend can be used directly in the garden, in containers, hanging baskets, raised beds, and anywhere you want to get growing. Delivery is arranged to your property and the soil comes in a large tote bag on a wooden skid. Unlike other soil deliveries that gets dumped loose on your driveway or lawn, there is no mess.
We guarantee our soil to be clean, free of heavy metals, and safe to grow your edibles in. The worm castings, which are the primary ingredient in the blend is certified organic by Pro Cert which means you can have peace of mind in choosing this excellent blend for your garden.
The YUF Potting Soil Mix and YUF Custom Soil Blend are quite similar. The only difference is that there is an increased percentage of peat and vermiculite in the YUF Potting Soil Mix to lighten up the soil weight.
More Information:
Most of the time our soil gets delivered on Saturday morning using a truck with a power lift gate. It then gets manually wheeled to the final delivery spot. That means the delivery spot has to be easily accessible both by the truck and by the manual pallet mover. Therefore, the final delivery spot cannot be beyond a steep slope, up some steps or through a very narrow laneway. Please contact us if there are any special considerations for delivery or to confirm there is a suitable delivery location.
If you are not going to be home for the delivery, we suggest that you mark the area where you'd lke the soil to be delivered to. You can use some sticks, a pylon, or something to indicate the delivery location.
Once you are done with the soil, we encourage you to reuse or recycle the skid and tote bag if you have a need for it. We can also arrange a pickup and ensure that it gets reused for future delivieries and not get put into the trash.
Posted by Chris Wong on December 08, 2012 0 Comments
Why We Love It:
The EarthBox Organic Garden Kit is used around the world by commercial farmers, hobbyists, and home gardeners alike. The reason why it continues to be so popular is that it really works and makes gardening as simple and as easy as possible. It has a small footprint and comes with rolling casters, which makes it portable and easy to move should you have only a small space to put it or if you end up moving. Young Urban Farmers is proud to be an official Canadian supplier of the EarthBox and its accessory parts.
The EarthBox also comes with two excellent accessories - a 4' staking system, and an automatic watering system. The staking system attaches directly onto the EarthBox and comes with two outriggers to give it additional stability and strength to hold up your climbing or tall plants like cucumbers and tomatoes. Each automatic watering system can keep up to 30 EarthBoxes watered when connected within 200 feet of the spigot. It comes in a two-, six-, and twelve-box accessory product.
Why Our Customers Love It:
Our customers love the EarthBox because it is one of the easiest to grow systems they have used. After the initial pouch of organic fertilizer and organic dolomite is placed into the box at the beginning of each season, there is no need to fertilize or add additional nutrients to the box.
The other reason our customers love the EarthBox is that it is very rugged and durable. It can be left outside during the winter to freeze solid and left outside to bake in the heat of the summer sun for years and years without adverse effect. Maintenance is also a breeze whether you water manually or with the automatic watering system. The reservoir can hold up to 3 gallons of water and the mulch cover reduces the moisture loss during evaporation and eliminates weeding.
Additional Information:
The EarthBox is easy to setup and easy to assemble as it comes with written and visual instructions. Download a pdf copy of the EarthBox setup instructions. If you are setting up the box yourself, you will need two cubic feet of potting soil and your transplants (or seeds) and you'll be ready to go. We suggest putting the EarthBox on a tarp when putting the potting soil into the container as this makes things easy and neater to clean should some extra soil not make it into the box.
When growing indeterminate tomatoes in the EarthBox, a staking system is highly recommended. Make sure you weave the branches through the netting before they get too big and to ensure they get adequate support
Herbs are also easy to overwinter in your EarthBox. The following spring, we suggest adding in additional organic fertilizer and dolomite into your box to ensure the plants get adequate nutrients to keep on producing new and strong growth. You can continue to use the same mulch cover if it is still in good shape, or you can use a new one. Perennial herbs like chives and thyme can be divided for additional plants or left intact for another year of growing.
Frequently Asked Questions:
Q. Where is the best place to put my EarthBox? A. A South-facing location that gets full sun is best, as veggies and herbs love the sun. The EarthBox can be placed directly in the garden, on a deck, patio, balcony, rooftop or wherever you have a flat and sunny surface. As long as your plants get at least 4 hours of direct sun, you can grow greens like lettuce, mizuna, and kale and many herbs .An East- or West-facing balcony can work, though yields and grow will not be a strong and vigorous. 6 or more hours of direct sun is recommended and will allow you to successfully grow more varieties of plants.
Q. What kind of plants can I put in an EarthBox? A. You can put almost any kind of plant in there, however you should keep to plants that grow to about the same height to avoid having one crowd/shade out the others. For that reason we do not recommend putting tomatoes and herbs in the same box, nor we recommend putting cucumbers and lettuce together. The smaller herbs or greens will most likely get shaded out by the taller plants. If you want to grow multiple kinds of plants, we suggest getting multiple EarthBoxes.
Q. How many plants can fit in one EarthBox? A. It depends on what kind of plants you want to grow. We can fit a maximum of 2 tomato plants per EarthBox, while herbs we can fit a maximum of 6 different kinds. Refer to the EarthBox setup instructions for more details.
Q. What is the staking system? A. The staking system is an add-on that is highly recommended for tomatoes, cucumbers, peas, and other climbing plants. It gives the plants support while they grow and attaches directly to the EarthBox unit. It is available as an add-on purchase for $55 + HST. Read more about the EarthBox staking system.
Q. How big are the EarthBoxes? A. Each EarthBox measures 29″ L x 13.5″ W x 11″ H
Q. How much do the EarthBoxes weigh? A. The weight of the EarthBox depends on what you have growing in the box, how much water there is, and how large the plants are. Empty, it weighs 3.6kg or 8 pounds. When fulled loaded with large plants like tomatoes, it can weigh over 36.3 kilograms or 80 pounds.
Q. What is the EarthBox made of? A. All of the EarthBox components are manufactured from #2, #4, and #5 plastics, all of which are food-grade and recyclable. In addition, the plastic UV-stabilized and frost proof so you can leave it out in the sun all summer and let it freeze in the winter.
Q. What kind of growing media should I use? A. almost any brand of peat-based growing media for containers or hanging plants will work. You’ll need 2 cubic feet (60 dry quarts) per EarthBox.
Q. Can I use liquid fertilizer or fertilizers that are mixed with water? A. Years of scientific research have gone into determining the type, quantity and placement of fertilizer to maximize plant health and production. Liquid fertilizers defeat the purpose of the EarthBox system, as nutrients are not provided on a constant stable basis. An occasional shot of liquid fertilizer, in addition to the fertilizer strip, is okay, but not necessary.
Q. Do you ship The EarthBox across Canada? A. Yes
Q. I have another question not listed here A. Please contact us at info@youngurbanfarmers.com for more information.
Posted by Chris Wong on December 08, 2012 0 Comments
Raised Beds Gardens are one of our flagship products and have provided our customers with excellent growing conditions for many years. We've grown everything from arugula to zucchini, tomatoes, herbs, carrots, and everything in between. The most common limitation is running out of space to plant everything that our customers want to grow in just one raised bed.
What's Included
For our GTA customers, all of our raised beds come with everything you need to get started. After identifying a suitable area for the raised bed, our team of urban farmers will come to setup and install the bed, including all the materials, the soil and the seeds and plants for one round of planting. Add-ons such as our copper trellis, garden accessories, and additional rounds of planting are available for an additional cost.
Raised Bed Materials
We construct all of the raised beds ourselves using western redwood cedar, which is a durable, attractive, rot-resistant, natural material. It has natural oils that protect it from decay and insects and is more durable than eastern cedar varieties. While the soil will have to be amended with extra compost and nutrients each year, the wood in our raised beds will last for many years.
Our Soil Mix
One of the secrets to excellent gardening results is our premium custom soil mix made from a variety of ingredients including worm castings, vegetable compost, vermiculite, and more. It is made locally without animal matter (no composted manure) and if full of bio available nutrients. It has good water retention properties and is loose and easy to work with. Our soil mix can also be purchased individually. For most of our gardening projects, we arrange for the soil to be delivered to the garden location in advance of the setup date. Our soil mix comes in a sturdy tote bag which makes for a no mess delivery.
Our Seeds and Plants
We purchase and use only untreated seeds in our gardens. In addition, many of our varieties are open pollinated, heirloom, and certified organic. Some of our seeds are hybrid varieties None of the seeds we use are GMO. For our transplants, we start the majority of our plants at our partner greenhouse just outside of Toronto. -see pictures of our greenhouse and started seeds
Raised Bed Sizes
Our raised beds come in a variety of sizes and heights. Custom sizes and height of the raised beds can be ordered by special request. The most common ones are listed below:
4′ x 4′ square
2′ x 8′ narrow
4′ x 8′ wide
8" height
16" height
A common question we get asked is the difference between the different sizes and heights of our raised beds. The simple answer is that the larger the surface area of the raised bed, the more quantity and variety of plants you can grow. If the bed can be accessed on all sides, having a 4' x 4' or 4' x 8' bed provides a small footprint and can be placed in a variety of locations. If the bed is being placed up against a wall or fence and cannot be accessed from all sides, then our 2' x 8' narrow bed will probably be a more suitable option. At 2' wide, reaching all areas of the bed is still manageable for most people. Wider than 3' can make harvesting at the back a little more difficult. In terms of depth, a deeper depth means more soil, more nutrients, and more space for the large plants to grow and expand into. With deeper beds, larger sized carrots can be planted, more moisture is retained in the soil, and there is less of a need to amend the soil with additional compost after the first year. All plants will grow fine whether placed in our 8" or 16" beds.
Who Raised Beds Are For
There are many reasons why we love gardening with raised beds. The soil warms up faster in the spring; it requires little weeding; produces delicious veg; can be built in a variety of sizes; and makes for an enjoyable experience right from day one. Raised beds are great for people who want an easy way to get started with vegetable gardening and don't want to get overwhelmed with a large project, don't want to dig up their heavy clay soil and want to have an enjoyable experience at the same time.
Who Raised Bed Gardens Are Not For
There are only a few reasons why a raised bed would not be a suitable choice. The first reason is space/location. Raised beds are not a good choice for balconies due to their weight. Many apartment and condo buildings have specific weight restrictions as well as regulations preventing water from dripping water off the balcony as it will due to the built in drainage of the beds. Raised beds are also not the most suited to being placed on a wooden deck as the moisture from the bottom of the raised bed will speed up the decay of the wood on the deck. The third reason a raised bed would not be suitable would be due to a higher initial setup cost. Raised beds take an initial investment in terms of the materials and soil. For people who have a large area they want to grow food in, setting up multiple raised beds can add up quickly in terms of costs. If that is the case, we can suggest going with an in-ground garden or starting with just one or two raised beds and then expanding gradually over several years.
Square Foot Gardening Method
One of our favourite gardening methods is the square foot gardening method. We've made a few slight modifications that we find allow for an easier and more enjoyable gardening experience. Some of the best things we like about the method is that it makes for an attractive garden, produces high yields, prevents people from walking on and compacting the soil, and is easy to weed and water.
Other Features
When we construct our raised beds, there are several things that go into making them functional and durable.
We use outdoor deck screws with coarse threads for excellent holding power
Deck screws resist corrosion, outperform nails and other fasteners, and allow the bed to be deconstructed if desired
We put on a 3/8" plywood bottom board that allows the bed to sit evenly on any flat surface, including decks and patios.
Drainage holes are drilled to prevent drowning of the roots
Raised beds can also setup without the plywood bottom
Along the surface of the raised bed, we put attractive grid boards to divide the bed into neat 1 square foot sections
This makes planting, labeling and keeping track of your plants easier
Like the plywood bottom, we can also setup our beds without this feature
Posted by Chris Wong on December 08, 2012 0 Comments
Why We Love It:
The ScareCrow sprinkler is easy to setup, simple to install, and is small and compact both the garden and to store over the winter. The best part is that it really works. Animals get scared away and learn not to come back to the garden area. We've even heard stories of commercial farmers using multiple scarecrows sprinklers daisy chained together to keep animals away from their fields!
Why Our Customers Love It:
For our customers with animal issues, they love that this is a natural way to keep them away without chemicals, traps, or other methods. It can be adjusted to cover the exact area. The only thing they need to remember is to turn off the sensor before watering or harvesting from their garden, otherwise they may get a bit o an unexpected shower.
Frequently Asked Questions:
Q. Will the ScareCrow protect my vegetable garden? A. Yes. The ScareCrow has been proven to be effective at protecting vegetable gardens including raised beds, container gardens, and in-ground gardens.
Q. How long will the ScareCrow operate before needing a new battery? A. Results vary from a few weeks to a year depending upon how often people, pets or the wind trigger the unit. The average is between four and six months. The ScareCrow will typically fire approximately 3000 times from a single battery.
Q. How much water pressure is needed? A. 30 to 80psi. If your water pressure is greater than 80psi, we recommend installing a pressure reducer (available at hardware and irrigation supply stores) at the hose bib. Most taps at a residential house have a psi pressure of between 40-60.
Q. Does the ScareCrow work at night? A. Yes. The ScareCrow works during the day and at night because it uses an infrared sensor.
Q. Can I adjust the sensitivity of the ScareCrow? A. Yes, you can adjust the sensitivity with the simple twist of a knob. Set it to 0 to turn it off or to 9 for maximum sensitivity
Q. Can the ScareCrow be used in the winter? A. No. The valve in the ScareCrow could be damaged by freezing temperatures. We suggest you bring the unit inside if there is a risk of freezing weather.
Q. Can I setup multiple ScareCrows if I have a large in-ground garden to protect? A. Yes, you can connect multiple ScareCrows together to protect a large area or for added protection.
Q. How do I setup my ScareCrow sprinkler? A. Each ScareCrow comes with a manual on how to setup and use the product. You can download an electronic version of the manual.
Q. What kind of warranty does the ScareCrow have? A. The ScareCrow comes with a 2-year warranty.
Q. Do you ship across Canada? A. Yes. We ship across Canada. We do not ship to the United States at this time.
Posted by Chris Wong on December 18, 2012 0 Comments
Why We Love It
The EarthBox Staking System allows you to extend your growing vertically and grow tomatoes, cucumbers, pole beans, and more. Like the EarthBox Container Garden Kit, all plastic components are durable, food-safe and UV-stabilized. It reaches a height of 152 centimeters or 60 inches when fully assembled. Tomatoes and cucumbers grow great on the trellis. Ensure that you weave the vines through the nylon netting to ensure they stay properly supported throughout their growth. The staking system is not suitable for use with the EarthBox stand.
Setup Instructions
Each EarthBox Staking System comes with a set of written and visual instructions. It does a great job of outlining how to setup your system. Download a pdf version of the staking system instructions.
Additional Setup Notes:
The instructions provide a lot of great information on setting up the staking system. We've included a few other tips that we've found useful in setting up the kit.
Use a squirt of WD-40 on the ends of the straight connectors and T-connectors to allow for easy insertion of the vertical and horizontal tubes
For easy winter storage, you lift the staking system out of the rim clamps to store it flat over the winter
Posted by Chris Wong on December 18, 2012 0 Comments
Why We Love It
The EarthBox Automatic Watering System allows you to keep your EarthBoxes watered even if you don't have time to water them on a regular basis. The system uses a series of sensors along with a series of patented valves and the water pressure from the hose to keep your boxes watered - all without batteries or electricity. Each sensor works independently, which means that you can connect a box of tomatoes along with a box of herbs to the same system and each one will get only the amount of water they need. It won't overflow the boxes and each pressure regulator can be connected to up to 30 boxes within 60 meters or 200 feet or the spigot. The water regular is the most important piece and controls the pressure from the tap to 20psi. It comes with a washer screen to prevent debris from getting into the tubing.
Setup Instructions
Each EarthBox Automatic Watering System comes with a set of written and visual instructions. It does a great job of outlining how to setup your system. Download a pdf version of the automatic watering system instructions.
Additional Setup Notes:
The instructions provide a lot of great information on setting up the system. We've included a few other tips that we've found useful in setting up the kit.
Attach the hose attachment first
If you only have one outdoor tap, we recommend using a Y splitter so you can still attach and use your hose at the same time
If the tap connection is very tight and close to the wall, use a short hose extension to allow easy installation
Open up the tubing the day before installation to allow the tubing to uncoil and make it easier to unravel.
To attach the tubing to the connectors, use rubber gloves to allow you to get a good grip and securely attach the tubing to the connector
You can also use a hair dryer to heat up the tubing to make it easier to attach to the connector
Mineral oil can also be used to connect the tubing to the connectors
Ensure each sensor is securely placed inside each watering tube and is pushed all the way to the bottom
Use the forks to securely attach it to the watering tube
Customer Testimonials
Worth Its Weight in Gold The AWS keeps a constant water level in the Earthbox...a godsend during peak growing season, esp. in hot climates. Recommend you order early as Earthboxs mfr sometimes cannot keep up with demand. I Wouldn't Earthbox Without These! I am a lazy gardener. I have to say, I have 18 earthboxes in my yard, and all of them are on the automatic watering kit. I would not have an Earthbox garden without it! I plant my garden and don't touch it again until harvesting! I love it.
Posted by Chris Wong on December 12, 2012 0 Comments
Why We Love It:
The Palram double cold frame offers a lot in a small package. It is lightweight, easy to assemble and disassemble, stores compactly when not in use, is very strong and durable, and works great to get your garden a head start in spring and extend your season in the fall. As with most things, you get what you pay for in terms of quality including workmanship, design, and ease of use.
Why Our Customers Love It:
For the avid gardeners, spring can't come soon enough, and winter comes too quickly. Having one or multiple cold frames allows them to have an early crop of greens and keep things growing much longer.
Setup and Installation Tips:
The cold frame requires assembly once you receive it. While the included instructions are very helpful, we've included a few additional tips that should help to make installation as easy as possible. Budget one hour or one and a half hours for a first time setup.
1. Use a Cordless Drill Instead of a Screwdriver If you use a manual screwdriver, it will take much longer and you'll have a very tired wrist at the end. The main reason is that the screw sockets do not come pre-threaded. That means when you are installing each screw, you will be creating the thread that will ultimately secure the pieces together.
2. Study the Diagrams Carefully Each part is number and all the pieces (except the screws and washers) are numbered. Ensure that you use the correct piece and in the correct orientation. It is easy to put many pieces on backwards or in the wrong orientation. Doing this right the first time will save you from having to disassemble and reassemble the cold frame. Misplaced the instructions? Download a PDF copy of the assembly instructions.
3. Tighten Screws Completely
If you are using a cordless drill like we suggest in tip #1, this shouldn't be too difficult. Tightening each screw completely ensures that when you attach the roof pieces to the frame, it will fit snug and minimize the chance of the edges catching and warping.
4. Putting on the Corner Caps The cap piece on the corner legs can sometimes be tricky to put on. In our experience, we find that with especially tight pieces, starting from the outside corner edge and rolling the piece downwards makes an easier and tight fit.
5. Use a Large and Flat Workspace Setting up the cold frame in a small area will make this more difficult to work in. We recommend having a work space of 10' x 10 to avoid getting too cramped.
Usage Tips:
1. Putting on the Roof Pieces. As part of its normal operation, the roof pieces will be taken on and off for regularly things like watering, weeding, and harvesting. When taking off the roof piece, lift until the roof piece is almost perpendicular to the ground. The hinge should release and the roof piece should come away easily. To put the roof piece back on, position the roof piece so it is almost perpendicular to the ground and sitting in the groove where the hinge attaches. With one hand, slowly lower the roof piece into position while using the other hand to push upwards to ensure the hinge catches. Once the roof is about half closed, the hinge should be securely attached. See the picture below for more details.
2. Propping Open the Roof Pieces One great feature about the cold frame is that you can prop open the lid to allow for more air flow and to ensure the plants don't get too hot inside. Using the
3. Anchoring the Cold Frame to the Ground Each of the four corner pieces come with a spot to attach the cold frame to the ground. We find that using old tent pegs, ground staples, or other similar product helps to keep the cold frame from potentially blowing away. As an alternative, you can also use extra soil to mound around the lower lips of the cold frame on both the inside and outside to secure it to the ground.
4. Keep the Roof Pieces Securely Closed The roof pieces will naturally stay down due to gravity, however they may get propped up because of wind or animals. If you want to secure the roof pieces to the frame, you can do that too. Instead of using the arm pieces to prop up and vent the cold frame, use the same pieces and swing them up and around until they lock onto the catch on the corner pieces. This will hold and secure the lid in place and provide additional structural stability for the cold frame.
5. Start Fall Plants 6-8 Weeks Before the First Frost Date This will ensure that the plants have a strong enough root system and large enough leaves to continue growing (albeit much slower) when the days get shorter and the temperatures get cooler. If the weather gets too cold, the plants may not grow very much if at all even in your cold frame.